Wednesday, December 5, 2018

Rowing - Erg Basics


Rowing is a fun and effective way to train your aerobic system. Rowing is a natural motion and can be used indoors with a rowing machine.


Below are two videos focusing on the set up position and a drill to hone in your rowing technique.


Set Up:


Set up is crucial when beginning to use the concept 2 rower as it sets the foundation for your pulling motion. A simple checklist to think of when setting up are:
  • Feet placement: Make sure your feet are at the correct level of foot placement and the strap is tight across your foot.
  • Damper Setting: The damper is the lever on the side of the flywheel housing, or fan cage, that controls how much air flows into the cage. A higher damper settings allow more air into the flywheel housing creating more work it takes to spin the flywheel against the air. A lower damper settings allow less air into the flywheel housing, making it easier to spin the flywheel. Think of a gear setting on a bicycle. It is recommended to train at a lower damper setting until you master your technique.
  • Posture: Upright posture with shoulder and back musculature engaged


Legs, Hips and Arms Drill


Common mistakes in the rower include rowing with just your arms, rounding your back, setting the damper too high and having a poor sequence of body movements when rowing. The following drill is used to improve the sequence of your rowing.


Dan Griffin SPT, CSCS, CFL2

Dan is currently a clinical student at Soul Physical Therapy. He is a strength coach and CrossFit Level 2 instructor. He will be opening up his own physical therapy practice called Resilience PT and Wellness in Agawam.

Follow Soul Physical Therapy on social media:

Facebook https://www.facebook.com/SoulPhysicalTherapy/
Instagram https://www.facebook.com/SoulPhysicalTherapy/

Set up a complimentary screening:
www.soulpt.com
978.524.0333


Wednesday, October 24, 2018

Back to Basics: Decreasing Low Back Stress


A big problem that we see in our patient populations and in the community are
misconceptions about proper rib, pelvic, and back positioning during functional
movements and prolonged postures. A common complaint we often get from
patients at Soul Physical Therapy is pain localized to the center of their low back
or on the sides. Often but not always, the culprit is over arching in our low back
(lumbar extension) without proper rib and pelvic position. Correct rib and pelvic
position is achieved with activation of the transverse abdominus, a muscle that lies beneath our “6 pack abs”. If unable to activate this muscle appropriately, we
can get too much compression in our spine, which can result in muscle tightness
and pain.


These extension or “arching” positions do not need to be avoided or feared, but we
do need to be mindful of what positions we are in for too long. These more extreme
positions into extension (arching) put more compressive forces through our spine
compared to a neutral or “straighter” spine and are more likely to lead to pain over
time if they are sustained or if they are loaded with strength training/lifting. Cortisone
shots, heat, electric stimulation, etc. can make this pain feel better temporarily, but in
order to rid this pain long term we must clean up our movement patterns to clear up
the source of the problem.


In this post, we will focus on how to achieve this position and what the differences in
these postures look like.


In this video, the subject shows how to achieve that ribs down, neutral spine/pelvis
position. If we look at his ribs, we can see how they are pulled down when he
activates his transverse abdominus as opposed to the initial rib flare position where
his back is more arched and pelvis is rotated forward. This muscle acts to give
stability through the spine to help accept the forces that on our body while we are
sitting, standing, and moving.


This picture shows the subject in a position where his ribs are flared out, his pelvis
rotated forward, and is putting more compression through his low back.


This picture shows the subject with his ribs down, pelvis in a neutral position with
less compression through his lower back.

Stay tuned for future blog posts on using these principles in the gym and exercises
on how to strengthen these postures!

If you're having back pain or have questions about these concepts / exercises.
Set up a free screening at Soul PT - 978.524.0333 or getwell@soulpt.com

Tuesday, October 9, 2018

Movement Variability at Work

Posture vs Sustained posture

Perfect posture is really a myth and super hard to maintain.  Think of more sustained postures as being problematic at work and in life.

When we sustain postures for too long we can put undue strain on certain areas of the body. 

The best way to combat sustained postures are through movement "resets".  The allow one to maintain movement variability and can also decrease pain

Sustained forward head and rounded shoulder posturing is something we consistently see in our corporate wellness work.

Balance things out...

Three common exercises we program are chin tucks, shoulder blade squeezes and a towel technique to maintain your ability to turn your head.

To combat forward head posturing we program in chin tucks:


To combat forward rounded shoulders:


To maintain neck turning we use this towel technique:


Did you know that Soul PT offers Corporate Wellness Projects that have saved companies hundreds of thousands of dollars?

Check out our case study on our website to learn more:

Corporate Wellness Case Study

Thursday, August 9, 2018

Single leg hinging

Single Leg Deadlift Variations:

*all promote weight acceptance and stability in the stance leg or forward leg


No weight
  • Greater focus on balance because there’s no weight to counterbalance the movement
  • If unsteady - foam roller or resistance band in the opposite hand is helpful or  lateralizing the movement to a kickstand RDL
Weighted split stance
  • Helpful if balance is unstable, still able to effectively strengthen the posterior chain of the front leg
  • Still can target one leg greater than the other which oftentimes is a target of rehab


Weighted & resistance band; resistance band - no weight; foam roller
  • Resistance band or foam roller increase tension in your anterior core and lat
  • The resistance band also encourages keeping the weight close to the body that
  • translates to traditional RDLs and improves overall lifting mechanics


Weight

  • Useful if pt is able to maintain proper upper body posture during the movement
  • Can increase load to continually achieve strength gains
  • May actually decrease the balance challenge due to counter balance effect


For more information on single limb training schedule a complimentary screening at Soul PT.  978.524.0333

Monday, July 16, 2018

Mom Tips with our resident mom Kara Jesi DPT

How to Manage “Mom Posture”


Being a mom is tough work. Feeding, holding, carrying and cleaning your new little one is the hardest, best job you will ever have. Once you get a minute to catch your breath you may begin noticing new aches and pains. “Mom Posture” is a term used to describe the cause of some of these pains- rounded shoulders, forward head posture and an anterior pelvic tilt are some of them. Here are a few tips and stretches to aid in reducing those symptoms and to help improve your posture.


Tip 1:
Switch sides when holding your baby. We become accustomed to holding our kids on one side causing unilateral back, hip, neck, and shoulder pain. By alternating sides, we can help equal that repetitive weight shift.


Tip 2:
Use pillows to help support you and baby when nursing or bottle feeding. This can help to decrease the amount you will round your shoulders and neck, and let you relax!

Tip 3:
Utilize a small seat or stool when bathing your baby in the bathtub. It is easy to just kneel down and lean over the tub, however, a simple step or stool can allow you to maintain a straight back during bath time.

Tip 4:
Try this alternative position for carrying a car seat. This position can help keep you upright while carrying your little one around. (picture)


Stretches:

1.     Doorway Pec Stretch 

2.     Chin Tuck 

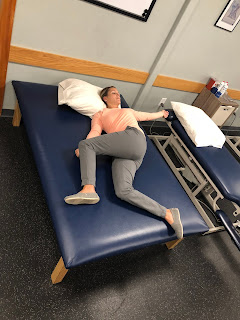
3.     Side Lying Rotations 


4.     Scapular Squeezes 

If you have questions or want to set up a free screening with our resident mom Kara Jesi DPT call Soul PT 978.524.0333 or email Kara@SoulPT.com.

Friday, March 16, 2018

Bridge Progression


Bridge Progression

The bridge is my go-to exercise for developing baseline anterior core stiffness, glute activation, and terminal hip extension.  If you can't bridge correctly is unlikely that you can execute a proper squat, deadlift or many other lower body and core exercises effectively.  You will need to master the rib position and core stabilization foundation in the first video prior to advancing to the next progressions.

1. Diaphragm breathing / rib depression with body weight bridge

  • Breathe in through your nose while allowing your belly to fill with air
  • Use purse lips and forcefully, but slowly exhale allowing your rib cage to drop down and abdominals to tighten.  This creates helpful stiffness stabilizing your lower back
  • Tighten your glutes and bridge up without losing core stiffness - your body should be in a straight line, without an arch or pressure in your low back


2. Single leg glute bridge (floor and elevated)
  • Bend one leg up to maximize glute contraction on the opposite side
  • Keep pelvis level (not allowing it to drop on one side) as you bridge up 
  • Elevating the working leg will increase range of motion and difficulty


3. Band resisted bridges
  • Working against the resistance of the band requires you to create more tension and help build more adaptation 
  • Stay tight in your abs with your ribs down to prevent arching in your lower back


Stay tuned as we load the bridge up with 135 lb

Stop in to Soul Physical Therapy to schedule a free screening if you have any questions with the exercises or want to learn how to apply them into your training.

Jenna Mattera DPT, CSCS
Soul Physical Therapy


Tuesday, January 23, 2018

Mindset and the Healing Process — Do you Know your Why?

Mindset and the Healing Process — Do you Know your Why?


The healing process can feel like a roller coaster ride — one day we’re feeling pretty good,
the next we’re in pain and unable to do what we did the day before. You might feel
limited by pain, or are going through a rehab process and focusing on not only
decreasing pain, but also restoring mobility, strength, and function so that you can get back
into doing what you love to do.


Our ability to ride these roller coaster waves with some modicum of grace greatly
influences the healing process. Healing is not linear and looks a bit like this:


Goiun and Kiecolt-Glaser state “psychological stress and other behavioral factors can affect
wound healing. The relationship between stress and wound repair is not only
statistically significant, but also clinically relevant.”¹


What type of psychological stresses slow the healing process?
  • Fear pre and post-op, as well as fear avoidance
  • Optimism, or lack thereof
  • Depression
  • Anxiety
  • Pain
  • Interpersonal conflicts/disagreements
  • Anger
  • Apathy


Over the next few blog posts, I will be sharing with you some of the key factors towards
managing and reducing stress, that you can immediately implement, in order to optimize
your healing process and help you to get back into doing what you do.


In today’s blog, we’ll dive into discovering what I like to call “your why.”


Why is it important to discover your why?
Your why will be one of the key motivators that keeps you going when
you experience challenging days.


Grab a piece of paper and write down these questions.
Then, write down your answers to the questions.


  • Why do you want to get better?
  • What do you want to be able to do?
  • Why do you want to do that?
  • How will you feel once you are able to reach your rehabilitative goals?


There are no right or wrong answers. The answers will be unique to you, your lifestyle,
and your process. Perhaps you want to be able to pick up your kids again, be able to
walk without fear of falling over, or return to playing sports. Close your eyes and picture
yourself doing whatever it is your particular goal is, your why is.
Allow yourself to see yourself doing it in action and notice how you feel.


This is the place where visualization meets manifestation, meets action, and in this case,
meets healing.
It’s a technique used by actors, sports players, millionaires, etc to bring what they want into the NOW.
Before doing your home exercise program, envision yourself where you want to be,
feel yourself there, then take action and do your program.


Anytime you start to feel stress-inducing emotions, or reactions, breathe and revisit your why.


References:
1Goiun, Jean-Phillipe and Janice K. Kiecolt-Glaser.
The Impact of Psychological Stress on Wound Healing: Methods and Mechanisms.
Immunol Allergy Clin North Am 2011 Feb: 31(1): 81-93.


Image: allennance.com

About Amanda Leigh Patti:
Amanda is a High Performance Mentor and Mindset Coach.
As a single mother of two amazing young men and an entrepreneur, she understands the
unique demands and stressors that balancing business and personal life entails.
She has used a variety of holistic modalities to move through pain, stress, and fear after
leaving an emotionally abusive marriage, recover from physical injury after a car accident
and debilitating yoga injury, and become a powerful advocate for her children.
She excels at helping high performers reduce stress and overwhelm, increase their intrinsic
happiness, and develop more intimate relationships.
Amanda has been studying and practicing the art of personal growth, movement, and relationships for the past 23 years. In 2014, she became a Certified Holistic Lifestyle Coach with the CHEK Institute. She is also a Certified Yoga Teacher, movement teacher, and humanitarian. At the heart of her work, Amanda has a desire to connect people to the core of who they are through a multi-dimensional approach to healing, rooted in traditional wisdom and modern arts. Find out more about Amanda here: http://amandaleighpatti.com